Thursday, January 10, 2013

Painting Miniatures - Gold Work

The last painting step is the hardest of all, the gold trim. I have come to dread this step because at this point I am starting to get really sick of working on the pieces and then I have to paint the gold. The paint has to be mixed perfectly so that it flows without brush marks and does not run off the line. If it bleeds off the line, it can be extremely difficult to remove. Great care and a steady hand is needed for this job. The concentration wears me out sometimes.

On one painting stick that has three pieces, I timed myself to paint the gold trim. Took me 27 minutes to paint three. As I work and get the rhythm down, I can speed up some but not much. I use a stopwatch to challenge myself like a contest to see if I can improve. This is a little trick I use on tough pieces.

Here is a picture of the gold paint mixed just right.

Miniature Figurine

Here are some pictures of "Blast-Off" and "Ice Cream" with the gold trim painted.

Miniature Figurine

Miniature Figurine

Miniature Figurine

Miniature Figurine

You can see how much the gold trim really improves the look of the pieces and gives them a nice finished look. After the gold trim is done, the pieces are allowed to completely dry. Then I spray each one with a matt varnish. Because the pieces are handled, they need a protective coating and the varnish does the trick. The varnished pieces are allowed to dry then onto the next step. More updates will follow.

Thanks for reading.
Randall Zadar
Sculptor/Zadar Studios
www.zadarstudios.com

Tuesday, January 8, 2013

Painting Miniatures Update - Final Steps

I have reached the final painting steps on the two special edition mice pieces. Since the last update, I completed the bows, grass and face details. You can see that each color step must be planned out so the colors layer correctly and cut over others. Everything has to be done in order so the pieces come out the best they can be.

Here are some pictures of the pieces up to this point. The last step was dotting the eyes. Amazing how the position of the eye can change the look of the entire piece. The eyes are a very important step that must be done correctly. The last painting step is the dreaded gold work. This is the hardest step of all and requires the steadiest of hand. Updates will follow.


Thanks for looking,
Randall Zadar
Sculptor/Zadar Studios


Wednesday, January 2, 2013

Painting Miniatures Update

Work is progressing on the two Special Edition mice figurines, "Blast Off" and "Ice Cream." Here I have progressed a few more painting steps that you can see. I am about half done with these pieces. Next, I need to work on the bow, ice cream and grass. Updates will follow.


Thanks for looking,
Randall Zadar
Sculptor/Zadar Studios
www.zadarstudios.com

Saturday, December 29, 2012

Can A Machine Make Art?

Here is something very unusual. Here is a one-of-a-kind bronze sculpture of a bird that was created by my casting machine the last time I cast. Sometimes when casting, molten bronze flies out of the crucible and lands behind the flask when the casting machine spins. This usually produces nothing but this time I noticed the interesting shape. To me I see a crane type bird standing behind an egg or a sunrise. A tree is seen at the back of the bird. I find it amazing the positioning of the legs, body, neck and head. Someone I showed it to thought it was a cat. I guess what I think is a tree is the cat's head and the tail is the bird's neck. To me it is a bird. Stands about 2" tall.

So I ask the question, can a machine make art? What do you think?

Thursday, December 27, 2012

Painting Miniatures - Mixing Colors - Step One

Painting miniatures can be a tricky process. Deciding what colors to mix and use can be harder than you think. All colors must be reduced and balanced so detail is not lost. This is the process I use after the white base coat is dry.

First, I inspect each piece to be sure there are no problems in the base coat. I then custom mix each color as I go. I apply the colors in steps, one at a time on every piece. Sometimes this gets a little hard to do. Applying the same step over and over again on so many pieces can be a challenge at times, but this is the best way to paint the entire edition so that they are all the same.

I use Alkyd paint, which are fast drying oil paint. I custom mix each color into these small plastic containers that have lids so they store good while the edition is being painted. They will usually keep for about a week before drying out so I must complete the painting step in that time or remix if needed. These are the colors I mixed so far and I am only on step one.


Here is "Blast Off" and "Ice Cream" with the first painting step applied. This one step alone took me two days. I was mixing colors and that took extra time. This edition is going to be harder to paint than I first thought.


I always try and mix the next colors in advance and test them on a few pieces before I paint the whole edition. Here are the next five steps on three pieces. I then look at them and make sure they are good before I proceed to the entire edition. This gives me time to correct something before all that work is done on the edition. I have learned to be careful with paint because it is easy to make a mistake. In the past I have had to start over on pieces and that is a big set back.


Stay tuned for more updates to follow. Thanks for reading.

Randall Zadar
Sculptor/Zadar Studios
www.zadarstudios.com
Wednesday, December 26, 2012

How To Paint Miniatures - Airbrushing

The first step in painting a bronze miniature is to seal the bronze. The reason for this is that bronze is over 90 percent copper, which can patina easily. This means that the paint can actually cause the bronze to turn colors or darken. To prevent that from happening, I dip each figurine in an acrylic sealant and heat with a hot air gun. This sealer melts into the surface sealing the bronze and giving a perfect base to paint upon.

The next step is to mount each bronze figurine onto a painting stick so it can be airbrushed and painted. This is what I call a painting tray. Holds 19 painting sticks. The round tray allows me to place it on a Lazy Susan and spin to each stick as needed.


The airbrushing begins. I use white enamel paint and carefully spray the paint as to not fill in the detail. This is a very tricky step and must be done correctly.


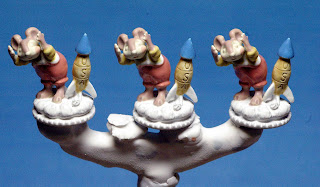
Here are the finished airbrushed pieces of "Ice Cream" and "Blast Off." Now they must sit and dry for two days before painting can begin. The white base coat must be completely dry before the oil paints and glazes can be applied.


The white base coat is essential to painting miniatures because it allows the colors to show the detail. Any kind of darker color would hide detail and make a miniature hard to see. The light actually shines through the paint layers and reflects off this white base coat giving the miniature an almost porcelain look.

Next step is mixing and painting colors. That will be in the next update.

Thanks for looking,
Randall Zadar
Sculptor/Zadar Studios

www.zadarstudios.com


Monday, December 24, 2012

How To Sculpt Wax - Sculpting Update - Robin Hood

I did some more sculpting on the miniature Robin Hood Wax Master making a necessary change in the design. Since the first post about this piece, I noticed a big problem. I felt it was expecting too much for the molten metal to flow up through the legs only, then up the arms, out into the bow and then through the arrow before cooling. So I added some sleeves and tipped him up so that the right sleeve touches his leg. This change improves the chances of a successful casting because the bronze flow is now closer to the arrow and bow. There is a lot of thought, planning and engineering that goes into a successful design that molds and casts well.


Also this changes the angle of the Archer. He now points upward; perhaps he is shooting at a castle or something in a tree or far away. I like this position better as there is even more a feel of action and suspense.

A friend suggested that I consider creating a series and add Friar Tuck and Maid Marian. This is a good idea. I encourage anyone following the process and development of these pieces to feel free to comment and make suggestions. I am sure there will be many more changes as I continue to sculpt this piece.

NOTE, 4/6/15. I have finished the Robin Hood piece. See the blog entry for more information. Here is a picture of the finished miniature bronze sculpture.

Robin Hood Collectible Figurine

Thanks,
Randall Zadar
Sculptor/Zadar Studios
www.zadarstudios.com